Some of Studio Technologies’ devices utilize file transfer protocol (FTP) to update the firmware running on them. Examples of these devices include the Model 5401 Dante Master Clock and Model 5422 Intercom Audio Engine. By default, these devices can connect to Studio Technologies’ FTP server to check for and download updates. In some cases, these devices cannot connect to the Studio Technologies FTP server. This can be caused by network security restrictions or no connection to the internet. The simplest solution to this problem is setting up a local FTP server on the network where these devices are connected.
In order to get started you will need access to FTP server software. In this Tech Note, configuration for Filezilla Server (free FTP server software) will be provided. Start off by downloading Filezilla Server for Windows from https://filezilla-project.org/download.php?type=server. Install the program with all the default settings.
Now that the program is installed a user account will need to be created for the device that needs updating. In this example, a Model 5401 Dante Master Clock will be updated. Open Filezilla Server and navigate to “Edit” > “Users” in the upper toolbar. The “Users” window should pop up. On the right-hand side click “Add” to add a new user. In this case enter “M5401” and leave the group selection to “none” (it’s important to note that the username can be anything but it is good practice to set the username to the model name). Press “Ok” to exit the “Add user account” window. Ensure the “Enable account” checkbox under the “Account settings” section is checked. Check the “Password” checkbox in the “Account settings” section and enter a password for the account (“password” is used in this example).
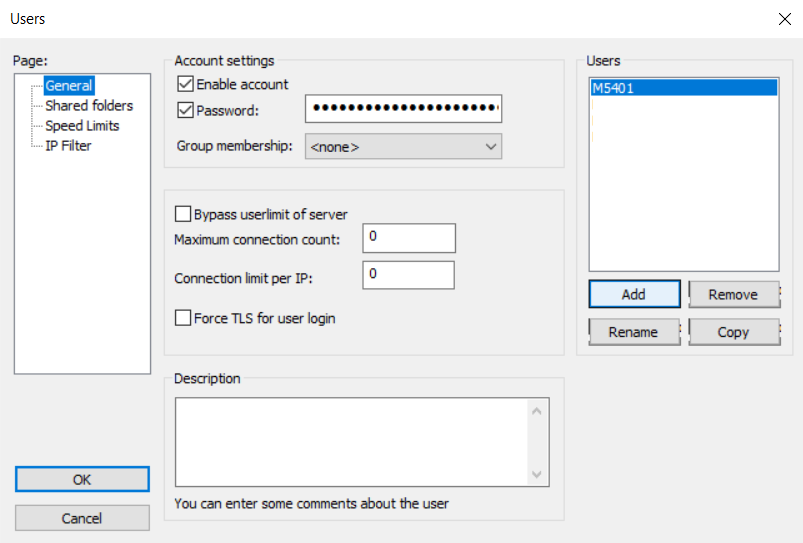
Users page in Filezilla Server
Next, navigate to the “Shared folders” page listed on the left-hand side of the window. Here a directory will need to be added for the device to access and download the necessary files for the software update. Click “Add” in the “Shared folders” section to add the new directory (in this example, “C:\Users\User\Desktop\FTP\M5401\” is the chosen directory but the directory can exist anywhere in the computer file system). Once the directory is selected ensure the “Read”, “List”, and “+ Subdirs” checkboxes are checked. This will only allow a device logging into the FTP server to read (download) files from the selected directory and any other directories that may be listed in the selected directory. Click “Ok” in the lower left-hand corner to save the changes.

Shared folders page in Filezilla Server
Once the user account and shared folder are setup the update files need to be added to the shared folder. The files for the device can be downloaded from www.studio-tech.com/downloads page. In this example the Model 5401’s Main Firmware will be updated. “M5401v1r08MCU.zip” should be downloaded from the Studio Technologies’ website and all the files should be extracted from the zipped folder. “M5401v1r08.bin” and “M5401VerInfo.txt” should be copied to “C:\Users\User\Desktop\FTP\M5401\”. “M5401VerInfo.txt” provides the Model 5401 with version information that is displayed to the user in the web GUI before the firmware download is started.
Now that the FTP server is configured and the update files are in the correct directory the final step before updating the device is configuring the FTP settings on the Model 5401. The server’s IP address (the PC’s IP address) is needed for the configuration. To get this open the command prompt and type “ipconfig” and hit “Enter”. Locate the IPv4 Address listed in the Local Area Connection section (in this example the address is 192.168.1.100).
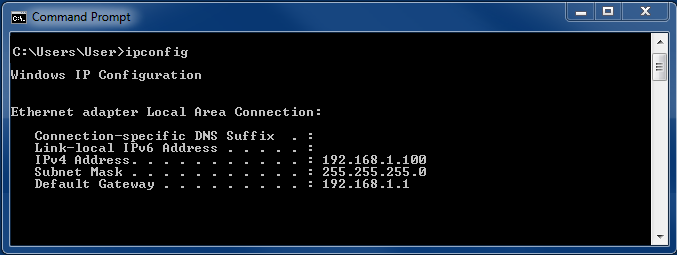
Run ipconfig in Command Prompt
Open a web browser and go to the Current Management IP Address listed on the front-panel display of the Model 5401. Login to the Model 5401’s web GUI and Navigate to the “System Information” page. On the bottom of this page there is a section called “FTP Server”. Set the “Active Server” dropdown to “Configurable” and click “Submit”. This should enable the grayed-out text fields. For the “Server Address” field enter the server’s IP address of 192.168.1.100. Set “User Name” to “M5401” and the “Password” to “password”. Press “Submit” and the FTP server configuration should be saved.
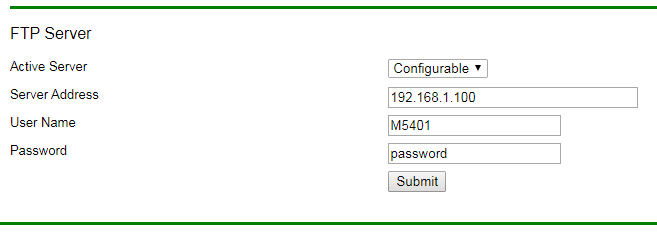
FTP configuration on sys.htm
To check the configuration and connection between the FTP server and Model 5401 go to the top of the “System Information” page to the “Main Firmware” section. Click “Check Now” and the Model 5401 will request the information from the FTP server. If the server is configured correctly the version and date in the row labeled “Available on FTP Server” should update.
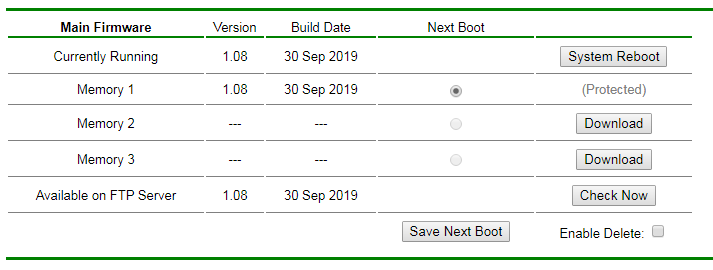
Main Firmware section on sys.htm
Once it is confirmed that the FTP server is running correctly download the firmware to one of the memory sectors.